Sunday, October 7, 2012

Hello October!!

Welcome to October, my most favorite month of the year!  I love everything about the month probably because of my childhood in the midwest and all the sights, sounds, and scents of the fall season. I remember the over-the-top beautiful leaves....one minute clothing the tree limbs in magnificantly colorful draping, the next minute falling to the ground. Back in those days, people raked their leaves into huge piles and burned them. While I'm sure it was terrible for the environment, it really made our little town smell wonderful while providing a beautiful glow in the evening's setting sunlight! I could muse about the sights and sounds of my childhood Octobers forever, but I think for now I will have to do a quick pictorial recap of my very busy first October week. It was a week that went by far too quickly! I want to savor this month that I so love and not have it speed by as quickly as this entire year has seemed to do!

So what kept me so busy this week? Weeelllllll........I finally started decorating for the fall and yes this is more than a month behind schedule for me, but hey, we had a baby!!! Well, ok, technically, my daughter and son-in-law had a baby, but it feels like "we"! (And I have to be careful here, because if you think I  ramble on about October, just get me started on this new little man in our lives and I will show you what real rambling is all about.) He's perfect, he's amazing, and it's hard right now to concentrate on anything else....

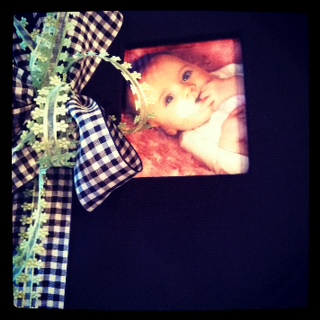
Here he is during a bath time...His dad took the picture,
I copied it and enlarged it and made it black and white.
Isn't he just the sweetest?

So, back to the fall decorating! I DO love the fall, as I said before, and I have been wanting the last couple of years to incorporate more teal and a lighter not-quite-sky-not-quite-aqua blue into my decorating. I decided that 2012 was the year to get this started and I had big, big plans to paint a few accent walls in my house. I am working around what I already have, which includes this fabric....

This is used in bits and pieces on the sofa and love seat in my
family room. There are four different fabrics used and
 the cushionscan be arranged  to create anything from almost
a "solid" colored piece to a piece in which all the fabrics are showing.
This is the fabric that I thought would allow me to add some teal even though
the overall look of the sofa and love seat is predominately a bronzy-green.
So, I went off to find the perfect paint! That was a lot harder to do than it has been in the past. I don't know if I've lost my touch, or my timing was off, or what the problem was, but nothing I sampled was just the "right" color, so I ended up painting just the back hall-alcove that leads to the master bedroom.
Yep! I went this dark and I love it against the white doors and the baseboards,
but, I don't thing it is the right color for all the different areas that I had intended,
so I have decided for time's sake and my sanity, to just kind of "sit on it" for awhile.
We'll see how I feel once the holidays have come and gone.
******

Of course one thing led to another and I didn't like the "beige" transitioning into the "teal",
so I decided I had to paint the archway the same white as the door, moulding, and baseboard.

Which of course meant that I needed to paint the other archway in the room white.

Which meant that I needed to learn how to properly end one color and start another
on highly textured walls!!! I tried it "my" way and then when that was a complete disaster, I researched
how the "pros" say to do it! It was a long process, but in the end worth every minute because the
lines really are crisp. Had I stuck to "my" way, the whole room would have ended up being re-painted the original
color.....It was just that awful!
Anyway, I do love the archways! I actually feel like we have different living spaces now, even though the rooms are very open to each other! I wish I would have done this last year as soon as we moved in!

So, I had my "teal", but became very unsure about using the lighter version of that color, so I decided to settle for now and just paint the bookshelf that had been hanging around in the garage, waiting for some TLC.

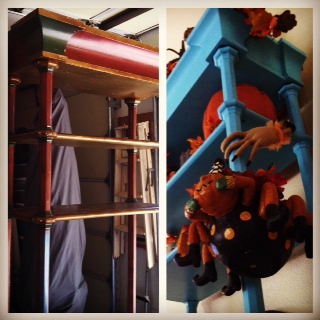
I have always loved this color of blue (with just enough of a greenish cast to lean towards the teal side) with the traditional fall colors of orange, peach, and gold and for now, this little shelfing unit will have to satisfy my craving. No large walls to be painted in this hue until I am absolutely certain!!! (Painting is H A R D!)

I had rearranged a lot of furniture and the entryway, (which really is more or less just a "wall") was empty, so for the time being, the bookshelf is filling that space and loaded with my "too many things-but can't bear to part with them" halloween decor items. I like to mix them in with every-day decor pieces, so that the effect is a little more subtle, but, the ratio just didn't allow that tactic. During the month of October, this is a predominately Halloween zone!! I have probably far exceeded the "tacky" limit, and every year I swear I will get rid of things by the next year....but I never do.

Finally, with the painting done (for now anyway) and the furniture in place, I could finish placing things. Almost every piece has some sentimental value (which is why I can't seem to let go) so I do a lot of reminiscing during the placement and that is always the fun part. Here's a peek at a few of the areas....


My "botox-lips" witch!

Wood Haunted House I painted years ago with some new "rub-ons" for accents.

I thought we needed a "Ghost Wedding Portrait" by my daughter's!
I used a black frame from the dollar store and cut black paper to fit inside.
I stamped three ghosts with white acrylic paint to the "under-side" of the glass, then cut
a black paper oval for the backing. I "swooshed" a little orange paint on the black paper and lighty
rubbed it over the frame.

My favorite witch hanging out amoung the family photos!


Vintage postcards alternately backed with two different papers and tied together for
a garland in front of two mirrors. It's necessary to "back" items that hang against mirrrors so that
the underside (which definetly shows) is pretty too!

I still have some tweaking and embellishing to do on this basket that I got
at Goodwill and spraypainted black! I can imagine all kinds of ways to finish this but would love to hear if
you have any ideas! And in the background you can see the blue-painted shelf in the "entryway".

Some of the match boxes I made from "scraps"....oh how I love to make these!

My other favorite little witch offering the big bad raven a little bite of her candy corn!

Labels made from Martha Stewart stickers.

I wish I could say that this is all there is, but there really is sooooo much more. I really might need to scale back just a wee bit. Maybe next year! What is your favorite holiday and how do you decorate, cook, celebrate or prepare for it? I would love to hear any ideas you have.....maybe it would inspire me to look beyond October 31st!

Thanks for visiting! Happy Octobering!

Friday, September 28, 2012

One Year for Ainsley

I have a special little friend that I have not seen since she was just a few weeks old and the first of October she will already be turning one! I have been making the "First Married Year" books (more on those in a later post) for about five years now, and when little Ainsley was born, I thought I would like to try a "Baby's First Year" version. There had to be a few changes to the format, and I wanted the pages to be more appropriate in color and embellishments for a baby girl, but other than those tweaks, it was pretty simple to create based on the "Married" books. The hard part, as always, was finding the time. These books seriously and without exaggeration, take at least 40 hours, start to finish to make. I always love the end result, but to begin is always daunting!


This is the cover of  Miss Ainsley's book
with the ribbon trimming that matches her nursery!

True to form, I started this book when Ainsley was born and finally just got it shipped off to her a couple of weeks ago. Her parents had been taking oodles of photos, so I had no doubt that they would have just the right ones to insert in the completed pages, AND at least I sent it before her birthday!!!

So here is a little peek at some of the book pages......

A mix of Easter, the inside cover, St. Patrick's Day, and Spring

Easter Detail


Stamping for texture and buttons to hold kite strings


All the flourishes, ribbons, and other embellishments are
adhered in a way that photos can be slipped under.
Photo placement is crucial, but once placed the embellishments draping
over the photos give the book that "custom" look!

A  little proof that although it was definetly a "girlie" book,
not all the pages were pink! Her nursery is white, black, and apple
green, so I wanted to showcase those colors in some of the pages also.

There are always some pages that just "have" to have certain colors!

A little composite of the Fall holidays!

A peek at Christmas, 4th of July,
New Year's Day, and Valentine's Day

A little more pink for photos of those who were anxiously awaiting her
arrival at the hospital.

Celebrating that very exciting "First Birthday"!


A few pages in the back for special times during the first year
that holidays don't quite cover.
So there you have it! My first ever "Baby's First Year" book. In all there were 28 pages.  I altered the cover and remade the inside of both the front and back cover as I always do with the "Married" books. I add pockets, and envelopes that coordinate with the facing pages and this allows
for a little emphemera storage!

I really enjoyed this first attempt.....but I will have to say the books are tiring....especially when I feel like I am a little pressed for time. I didn't allow time to carefully photograph the pages and for
that, I am entirely sorry. I wish I had taken the time and perhaps borrowed my son-in-law's camera for some really quality shots.....what's that saying about "hind-sight" being 20/20 vision. Ah well!!!
I have a brand new grandson to make a book for and I will be sure to take better photos of that....
Live and learn? I've lived long enough, haha, you'd think I would have learned these lessons.

Thanks for taking a peek....Have a marvelous Friday and weekend! It's Fall, glorious Fall, so go out and enjoy it! Love and peace to all!


Wednesday, September 26, 2012

I've Got Mail

The past month has been extremely busy and although I have been in a creative frenzy I haven't posted anything on my blog. I was feeling a little down about this yesterday and then I got the mail! I had received this......

It was a complimentary copy of the Fall issue of Somerset Life that will be on the newstands October 1st! I had been notified that a little "work" of mine would be published, but I didn't know that I would receive this notice and advance copy of the publication! I have not had anything published before because I usually only make things when I need them. What I create is usually finished right before deadline and sent off to its new owner. But this particular little piece had fallen into the hands of Stampington graphic designers and they submitted it and it made its way into this Fall's issue as a Creative Living Idea. (And yes, it helped that my daughter is one of the graphic designers.....hopefully, it was selected on it's own merit though! She doesn't have anything to do with the selection process, but she and two other designers submitted it without my knowing....and of course I do not mind at all!)

I am grateful for the submission and the subsequent printing! It has inspired me to try harder and do more, more, more! I needed a boost and this couldn't have happened at a better time!

The following photo is after my hubby and I sat on the sofa together and opened the package and looked at the issue! I really do love all the Stampington Publications! Please excuse the patheticness of this photo, we don't "self" take a lot and we are pretty poor at it. But, it was just such a fun moment to share with each other!


I am holding the magazine, but it is only half in the photo!
Told you we were bad at this! Haha!
 I spent a long time looking at the entire publication....I really love all the Stampington magazines, but this one is my favorite. I get so excited and so inspired by the work of the artists.....and some of my fondness stems from the fact that my daughter is currently Lead Graphic Designer of this particular pub! I know that I am the typical totally biased mom, but I do think she does a beautiful job with her part of designing the layout! It's hard not to have her living close to the rest of the family, but seeing first hand what she is doing right now, makes it easier!

And with that, I will say good day! If you are a "creator" I would  encourage you to submit something to Stampington and Company.....It really is a fun little perk to see your work in print!

Stay safe friends and have a beautiful rest of your day! Oh and last but not least, here is a picture of the layout!


Saturday, August 18, 2012

Fun Friday Finds (this week on Saturday)

I had intended to write about this little find yesterday, but was waylayed by a seriously nasty migraine that took me away from all things fun for the entire day! I am so excited about this little find, though, that I can't wait for next Friday to post it as a Fun Friday Find.....so forgive the title on an actual Saturday!

I am in the mood for and anxiously awaiting Autumn. I am longing to experience all of the wonderful sights, sounds, scents, and holidays it brings. I try never to wish time away. I make it a habit to "live in the moment" and appreciate what is going on currently, but, I think pretty much everyone who calls Arizona "home" starts pining for Fall about this time of year.

I love everything about Fall, but my FAVORITE times a million thing is Halloween. I have already unpacked a couple of boxes of Halloween decorations and what-nots to just peek and and make sure they (with all their magic powers) didn't wander off somewhere and are still happily waiting to be displayed. Everyone (or I guess I should say everything) is accounted for, but of course it is still too early, so they had to be boxed back up and stored for another few weeks.

Sorry!  I got so distracted thinking about the delightfulness of Halloween and Fall that I forgot the purpose of this post was to show you this great little find from the dollar store.


I was amazed that this heavy-duty, cardboard stand-up was just a dollar! I can imagine so many different ways to use it. A votive behind it would look amazing and cast fun shadows all over the room! It would also be great as a center piece with those cute little pumpkins piled around the base, or used as a backdrop for another item. It could be glued onto another chipboard piece and used for an album or book cover.  I think its possibilities are endless...............

I'm not sure how I will use mine yet, but, hurry to the dollar store and get one for yourself, because I am sure you will be delighted to have it fill some little space!

I did play with my photo of the cut out on Picfx a bit and sent away for prints of some of the images to use in card, tag, and page making. I thought you might like to see some of the fun results from my altering.....


This is the what I think a votive placed behind the cut out would look like!

After I distress and mount the image on chipboard or cardboard it will
look more like this!

I really like this more severly distressed look, but the little witch gets a bit lost.
I can't decide if I am ok with her being just a "hint" or if I need her to be more
prominent. You know my love for witches!!!!

Love this one! I think in Picfx, this was the Paint Dabble effect!
And if I were a painter, I would  paint this exactly!

Ah, the fun! I love being able to play around with the photos and see the different effects. It really helps me decide what direction I want to take with a photo when I use it on something I am creating.

I hope you are as excited about the Autumn months as I am and I hope you have enjoyed this little find! I think it is a pretty sweet little deal for only a buck!

Have a great weekend! Oh, and if you think of an amazing way in which to use this cut out, please comment, I would LOVE to hear any ideas you  have!


Thursday, August 16, 2012

About A Box...(And a Ring)

I found  almost the perfect ring for my daughter, Mykaela, recently in a little antique shop. I was staying with my friend at her cabin in Pine, Arizona and of course you don't visit Pine without nosing around in the local shops! I had given my older daughter, Summer, one of my rings on her 21st birthday. It had been a favorite of hers for years and that birthday seemed like the perfect time to give it to her. I had wanted to do the same thing for Mykaela, but never found anything that had that type of significance until that day in Pine.

Neither of my daughters resemble me overall. Summer, looks much like my mother did at her age and Mykaela, I think bears a striking resemblance to my husband's mom. Each of my daughters, though, have a feature or two that reminds me of "me", and with Mykaela, it is her hands. They aren't exactly like mine, but very similiar and some of the motions and gestures I see when she is using them look very familiar. There is a picture of me (from an ancient newspaper article about a craft fair I took part in) that shows my hands when they most looked like Mykaela's do now. I LOVED rings and my favorite was the one you can barely make out on my "first" finger in this picture.

Very grainy, but like I said, very old, from a newspaper and then I enlarged the copy
to focus on the ring!

The ring I found that day in Pine was the same size and shape and like "my" ring had a lot of detailing in the setting. Both rings were inset with shell and very delicate looking. Since I have no idea whatever happened to the ring I was wearing in the picture, I figured this would be a good substitute.

The purchase was made and that left me thinking about the presentation. I wanted something more than just sticking the ring in a box or a gift bag. Since the gift was inspired by something old, I decided to
make an "aged" looking box from one of the match boxes I keep on hand. I buy these
boxes (they come packaged in twos) at the dollar store. I love to detail and decorate them
for various purposes.....so if you ever have a need for "boxless" wood matches,
I'm your girl!


I chose a plain "paper bag brown" paper and stamped all over it with
my Tim Holtz paragraph of words stamp. Then I cut the pieces for top, bottom,
and sides and ran them through my Zutter electric distresser!
I heavily inked the edges and glued the pieces on and then rolled them by laying the box
flat....the folds in the box allowed this! I used my Cropadile to make holes for a jute handle.


I decided I would also cover the inside of the box, so more stamping, cutting, and adhering!
I found that by stamping the paper before I cut, I could have a continuous pattern from the
floor of the box, up the sides. I also added the "bird" stamp so that he would be
peeking at her when she lifted the ring out. (I call her my "Little Bird"!)


Searching through my drawers of supplies, I found these little pegs and
decided that this little box was going to have some "feet"! I stained them with ink
first and let them dry, then put them on with E6000. (Love that glue!!!!)
In this photo, you can see how distressed the edges of the paper are.
I wanted something that looked like it had weathered the ages and the heavy distressing did the trick!
Because the edges curl, I had to apply a few coats of dark brown paint to the box so that
the red, white, and blue, pattern wouldn't show where the edges didn't meet!
An extra step, but well worth the effort!


Finally ready for the top, I stamped her initials on the same paper and used
the scallop punch to cut them out. Again with the heavy inking. (And yes, I also heavily
ink my fingers when doing this.....never have been able to wear gloves!)
I'd been saving this glittery flower and it made the perfect final touch!


I wrapped the ring in an organza bag so she could still see a hint of
the little bird, but the ring wouldn't be rolling around and rattling.


Final piece ready to present! Now the difficult part was waiting for six more weeks until
she came home. I really wanted to give it to her in person!


And....here is the ring, beautiful on her delicate "Little Bird" hand!

Thanks for visiting today!
I hope you love boxes as much as I do! The anticipation and presentation of
a gift is always the most thrilling and rewarding part for me. I would love to know any fun
or sentimental ideas you have for gift giving!


Baby Boy shower for Boys and Girls!

Oh my goodness, Barbara! What part of blogging do you not understand?  I think the idea is to be consistant with posts.....I grasp the concept, but the actual "doing" has been a bit difficult for me! Soooo many things to catch up on....Let's just cut right to the "fun" stuff that has happened since my last post!


On the 4th of August, we had an "Oh, Baby!" shower for these two very happy looking parents-to- be. My daughter, Summer, and my son in law, Steve were the honorees at this shower hosted by
little Rett's three "Aunts-To-Be"; Mykaela, (Summer's sister), Anne, (Steve's sister) and Nickee, (Summer's brother, Kipp's, fiance)! I was an assistant to these three creative young women! And from start to finish, the entire process was a lot of fun. (And, yes, a little bit of work too. But, what's work when you're having a good time, right?)


Their idea was to do something a little different. Instead of the "girlie" mom-to-be shower, they wanted to do something for both Summer and Steve! A few of Summer and Steve's friends have children, but a good number of their friends have yet to marry, so this impending arrival is somewhat of a novelty. With that in mind the idea was hatched, (oooh, maybe just a bit of a pun there) to make the shower more "Saturday date night-out with friends" or as we referred to it, "Co-ed" style.


Mykaela (who happens to be a graphic designer) created the invitations, basing them on a photo that
Summer and Steve had used for their "We're Pregnant" announcement. Once the invitations were designed, a friend of Anne's printed them and then Anne got them addressed and sent out in record time. I was already impressed! Here's just a little peek at the invites, since I can't figure out how to get the whole photo in without all the info.....(Ah, my limitations!!!). You will have to take my word for it that they were really cute, with Steve's legs and shoes on the other side of Summer's.

Then it was on to the business of planning everything else. The shower was to be at our house because it would better accomodate the 45 or so people invited. I was actually excited about the prospect of it being at our place, because I felt like I could be more involved without getting in the girl's way AND they all agreed that I could work on decorations (as long as I kept it more contemporary and a little more on the masculine side than frilly....they know my tendencies all too well, haha!) I knew they would do a great job planning and executing, but, they all work long hours, and let's face it, entertaining is fun, but there is always more to do than there is time for. I wanted to be available to help out and I was excited about decorating!! Woohoo....Paper! My favorite thing!  In keeping with the co-ed and non frilly theme, we chose to use the colors that Summer and Steve had painted the nursery for decorating and anything else requiring color.


Nursery closet (which will hold changing table) colors.
What you can't really see are the nursery walls, the prettiest shade of mint, and
the glossy white crown moulding that separates the walls from the gray ceiling.


Summer has a tendency, with her work in commercial interior design, to base her color choices on upcoming architectural forcasts. She did this with her wedding and I knew from that experience four years ago, that there would be nothing in any party supply store with the baby's nursery colors! I knew we would have to make everything, so it would be best to keep things simple. A visit to my favorite scrapbook store yielded various two sided papers that made up the nursery colors and with that, the idea of pennant shaped banners was born. (I mean, if you are having decorations, what's more masculine than pennants???)


Finding these papers really made my day! They were a perfect
mix to pull off the look we were going for!


I was ecstatic to find that there were napkins in the nursery colors.....we just had to purchase several differnt packages and then use a few of each color!!! Two years from now, I know that all the prints and fabrics and anything else ready made will be bearing Rett's nursery colors, but by then, haha, Summer will have moved on to the next palette of up and coming hues! Meanwhile, I will still be using up the Kelly Green, Aqua, Royal Blue, Mint, and Butter Yellow napkins we have left over. (Gray is one of the colors also, but I didn't find gray napkins....fortunately.)


Found!!! The perfect blue for appetizer plates...the green in the cocktail napkins was a
little on the olive side, but it worked for our "Cocktail Hour".  I was allowed to go a bit more
frilly for the dessert table and the delicately dotted white and blue napkins worked great against our
mint green table cover. Summer loves using the clear rectangle plates, so we used those for the dessert table as well.
The other napkins and forks were for the main course table. We were so happy to find the colors!

The girls decided to serve sliders, (because burger's are Steve's favorite food in the world), potato salad, veggies, fruit, and Chinese Chicken Salad, (because that is one of Summer's favorites and not everyone eats red meat.)  In addition there would be a dessert table with as many little desserts as we could manage to make. There would for sure be Lemon Doodles, Rice Krispie Treats, Magic Cookie Bars, and Cupcakes. Nickee suggested we have "Cake Batter-Cookie Pops" as party favors to take home at the end of the evening. It all sounded pretty simple until you took it times 45! I'll admit that I was a little worried about pulling off sliders for 45 at 6:00 PM in the Arizona heat, but, I decided to let them do their thing...and I am really glad I did! The sliders definetly made the guys happy! And that was the biggest part of the plan; getting, and keeping the guys involved!

Nickee and Kipp took over planning the games and came up with two really good ones!  And, "Yay", they weren't the gross kind! They made a really cute board for MASH and then came up with a game for matching celebrities with their "crazy" baby names! MASH was great because the people invited weren't neccesarily connected to each other in any way. There were a few from high school, a few from college, and a few from work, etc. The only thing they all had in common were their friendships with Summer and Steve. They all became unified however, when it came to MASH. Evidently, everyone was fairly excited about the prospect of planning Baby Rett's future! Apparently,  he will go to the University of Minnesota, be a professional synchronized swimmer, marry a woman named Kennedy, have 12 children, live in Nogales, and drive a Konnisseg! So, lots to look forward to with our little guy! Pretty excited about having 12 great grandbabies!

After planning his future, it was time to open gifts, grab another drink or dessert, and before we knew it, the night had ended. I had a great time, I loved seeing all Summer and Steve's friends, loved catching up on what everyone had been doing, and loved watching the guys try to act like they weren't enjoying the "Baby" shower! It may have been their first, it may have been their last, but honestly, I think they liked being involved!

Some more photos of the night..........First, the planners, and hosts.........................


Anne and Jesse
These two live about an hour away and came early to help set everything up. So wonderful, except that it was sooo hot and Jesse got stuck setting up the "bar-drink" table on the back patio while Anne did a million other last minute things! So much to do in so little time!

Nickee and Kipp
They were our game planners and Kipp was the unlucky one that actually had to cook all those sliders out in the 110 degree heat! Nickee also made the adorable "About to Pop" cake batter, cookie pops that made great little party favors for everyone to take home!


Mykaela and Brendon
So..... Mykaela lives in California and came home a day early to help do all the food shopping, cooking, baking, and set up. This was the first time her boyfriend, Brendon had come with her for a visit.....We were so glad to have him, but oh my goodness, did he ever get stuck doing a whole lot of peeling, cutting, dicing, and slicing! Hope he'll forgive me for all of that!
He was a such a great sport about it and was a huge help!


The Guests......


Wendy, Stacy, and Summer


Summer and Jenn
You didn't have to be pregnant to come to the shower,
but Summer loved having her picture taken with you if you were!


Mykaela, Nickee, Kim, and Katie
Sporting the "Cake Batter, Cookie Pops"


Courtney, Steve, Ryan, Ricky, and Cynthia


Josh and Scott
 
Little Mama and her Dad


Wendy and Summer
A little "Bump" comparison!


Steve, Summer, and Kipp

And last but not least.....Desserts and Decor

Dessert Table

Magic Cookie Bars

The Amazing Cake Batter-Cookie Pops!

The Pennant Banner
(Look!!! No frills and "boy" colors only! The yellow was legit because they used yellow in the nursery!)

These little tables came in handy!
The garlands we sewed together from scraps of Pennant Banner Paper

The summary!

All in all, I think the traditioinal baby showers will always be a great thing, but I love the concept of having the mom and dad-to-be along with all their friends get together for a night of celebration! It took eight people to pull this
shower together and all the attendees to make it fun.  They say it takes a "village" to raise a child, so I say, let's start at "Baby Shower" time!